One of the significant changes you can do to your bathroom when renovating or redecorating is changing your bathroom vanity. Your bathroom vanity is an essential piece of furniture in your bathroom, and by simply changing it, you can change the overall atmosphere and style of this important room in your home.
However, before changing to new bathroom vanity, you first have to remove your current bathroom vanity.
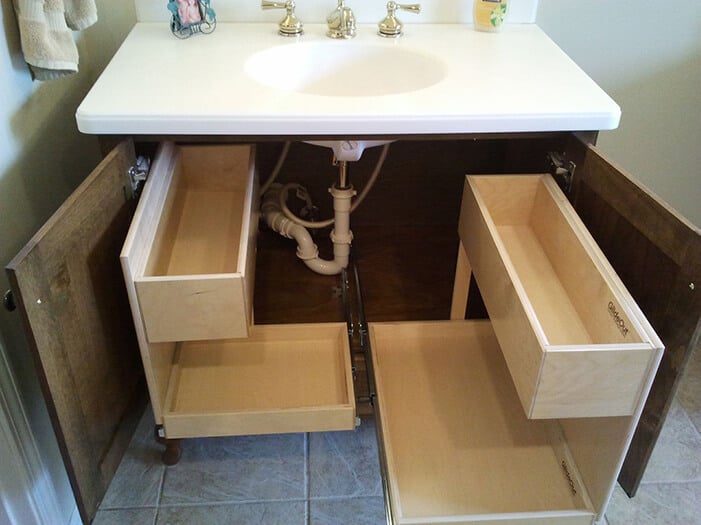
Modern bathrooms have countertops that house a raised or integrated sink (don’t crack the marble countertop). Since most bathroom vanities have a sink, they require a plumbing system. This plumbing system comes in two ways: 1) a plumbing system connected to the wall, or 2) a plumbing system connected to the floor.
This article will detail the methods of removing a bathroom vanity with wall plumbing and with floor plumbing. As well as the differences between the two methods. The advantages and disadvantages of each.
What are the materials that I will need?
Table of Contents
Removing a bathroom vanity (whether it has wall plumbing or floor plumbing) will not require you to fork out any money. You can even replace it with a real wood vanity for cheap.
However, you will need the following materials:
- Bucket
- Adjustable wrench
- Putty knife
- Shop vacuum
- Wood shims
- Chisel
- Hammer
- Utility knife
- Pry bar
- Grout scraper
- Safety equipment (safety glasses, gloves, boots, pants, long-sleeved shirt)

Initial preparations before removing your bathroom vanity
Whether you are removing a bathroom vanity that has wall plumbing or floor plumbing, it is essential that you first take the following initial steps to ensure a smoother removal process:
- Remove all items and products that are within your vanity cabinet and countertops
- Remove all towels that are hanging or off on bathroom racks or hooks on doors
- Use a cloth tarp to protect light fixtures, vents, or fans that aren’t being removed in the process
- Clear the floor from water, rugs, mats, trash, or other material to ensure safety when working
- Cover your bathtub, shower, and tubs with cloth tarps to avoid scratching or damage while moving your vanity
How to remove a bathroom vanity with wall plumbing
1. Cut off all water supply to the vanity by first shutting off the water valves that connect to the faucet of the vanity. The water valves should be located under the sink, and to turn them off, you have first to turn them counterclockwise all the way. If your vanity does not have water valves or its valves are defective, you have to shut off the water supply through the water valves on your home’s central water system. After cutting off the water supply, turn the tap on to drain the remaining water in the vanity.
2. Disconnect the faucets to the water supply by removing the tubes that connect them. Use an adjustable wrench to loosen the compression nut (or the connecting hose) and then remove the connecting pipes of the valve. Work with one tube at a time, and place a bucket under the valves to catch any leaks. After removing the tubes, scrutinize the valve for any leakage. If it is leaking, immediately shut off the water supply from the primary home water system, and replace the valve as soon as possible.
3. Remove the drain trap. The P-trap is the P-shaped tube under your sink. This will be full of wastewater, and so, you first need to empty it into a bucket carefully. The P-trap has three easily identifiable parts:
- 1) The straight tailpiece tube that connects to the sink
- 2) U-shaped section that connects part 1 and 3
- 3) A straight piece that connects the plumbing to the wall.
At the ends of parts 1 and 3, you will be able to find slip knots that can be turned by hand (or with the help of pliers) to remove the drain pipe. Slip off the P-trap after turning the knots counterclockwise. Then, prevent sewer gas from leaking into your bathroom by sealing the open wall pipe with a rag.
4. This is the perfect time to remove your vanity mirror if it is not glued to the wall, not to damage it when removing the rest of the vanity.
5. Cut through the connections of the vanity cabinet with the wall by using a sharp utility knife. This includes the caulk joints of the vanity top and the wall.
6. The first piece to remove from the vanity is the vanity top. And it is usually easiest to leave the faucet for now. It can be removed later. Unscrew any hinges that are connecting the vanity top to the countertop before lifting it. If it is glued in place, you can pry it open the same way you removed the caulk joints.
7. Next, remove the vanity cabinet by unscrewing all screws and hinges that connect the cabinet to the wall. Also, make sure to remove all trim left on the wall. If nails attach the cabinet, place a wood block against the wall before prying it away with a flat pry bar. The woodblock will serve as protection to prevent damaging the wall.
8. Now that you have completely removed your old vanity, scrape off any excess caulk using a putty scraper. Repaint the remnants of the vanity before installing your new one.
How to remove a bathroom vanity with floor plumbing
The removal process of a bathroom with floor plumbing is not much different from the removal process of a bathroom vanity connected to the wall. And so, the only details that are expanded on this subsection are the direct differences from the steps discussed above.
1. Cut off the water supply by removing the valves connected from the holes in your vanity to the pipe. Do not just shut off the water in the sink, as this could result in water overflowing from the floor.
2. Remove the U-shaped waste pipe that connects the sink to the bottom of the floor. Use a wrench to turn the valve counterclockwise before slipping off the U-shaped pipe. Make sure to place a bucket to catch all the wastewater.
3. Remove the remaining pipes that connect the water supply to the bottom of the vanity by loosening the nuts using a wrench.
4. Take a close look at the size of the holes cut from the bottom of the vanity. No action is needed if the holes are large enough for the water supply pipe. However, if they are too small, you will need to remove the valves using a basin wrench,
5. Use a utility knife to remove the vanity from its attachment to the wall. Then, lift the vanity top after removing any hinges or glue used to attach it to the vanity cabinet.
6. Ensure the vanity cabinet is free from any glue or attachments to the wall before having a person help you lift the vanity cabinet off from its pipes. Finish off your work by cleaning off any remnants and repainting the wall where the vanity initially was.
Those were the removal methods of removing a vanity with wall plumbing and removing a vanity with floor plumbing.
Now, you are prepared to take on this DIY project step by step.